Add Far-edge Devices to the Kubernetes Cluster
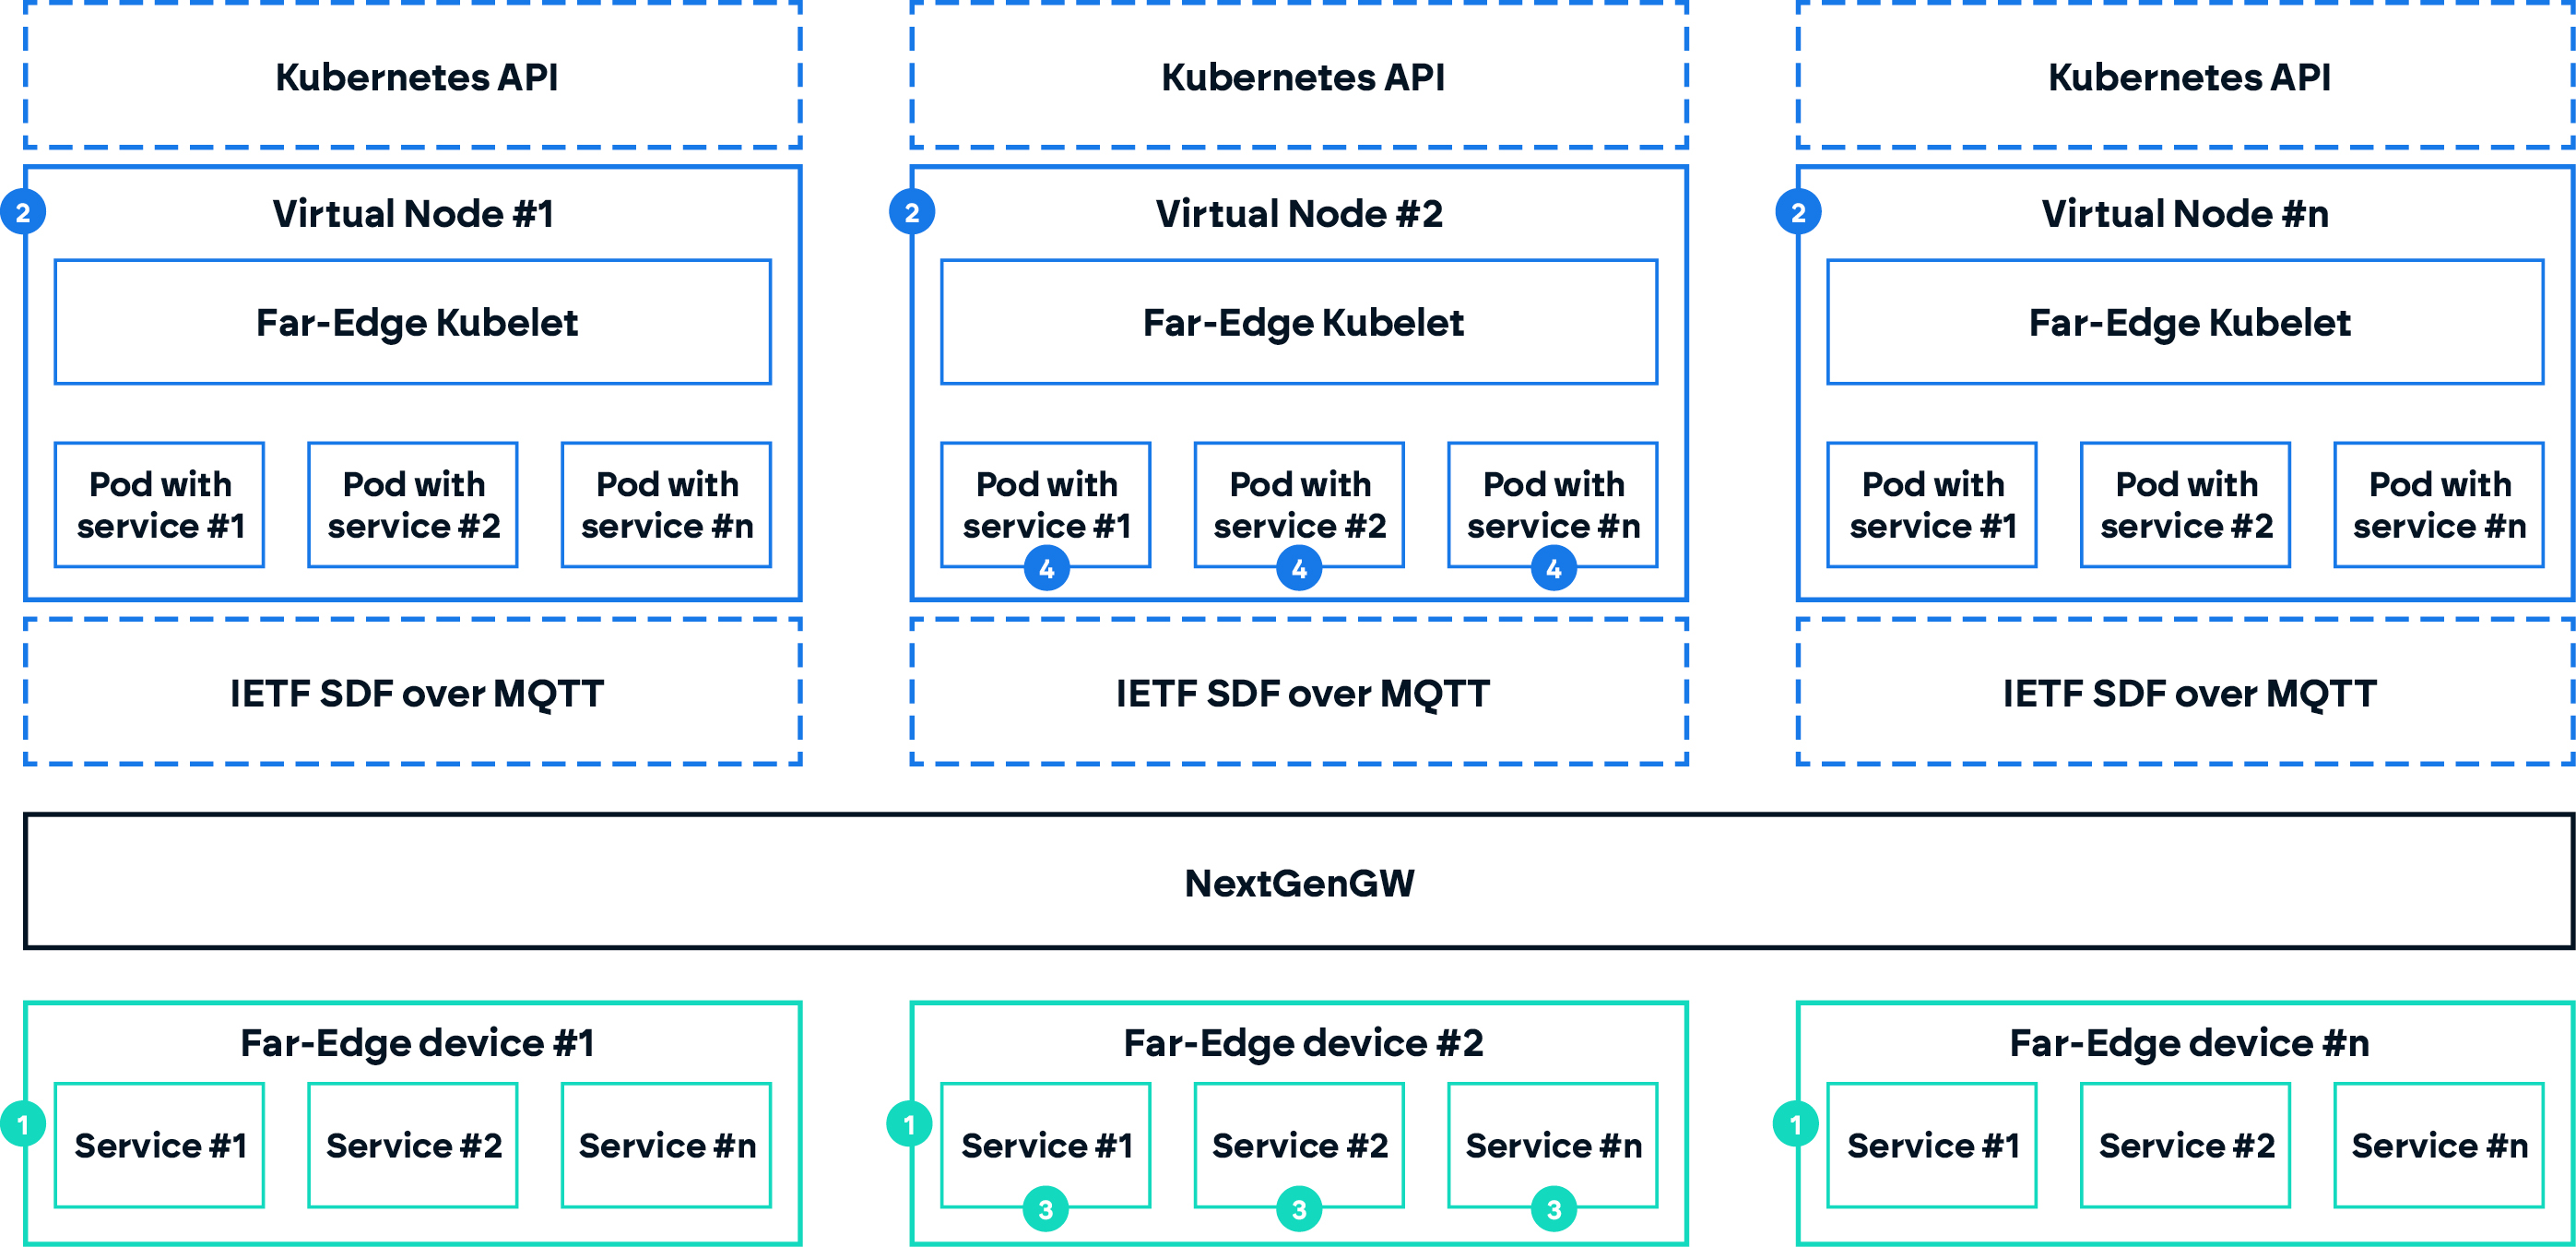
As explained in Introducing FITA, the Far-edge Node Watcher is the component responsible for adding the Far-edge devices in the Kubernetes cluster. It subscribes to the MQTT "announce" topic in which the NextGenGW announces the registration of new Far-edge devices. When a new Far-edge device is announced, the Far-edge Node Watcher creates its Virtual Kubelet Pod that proxies the Kubernetes control plane with NextGenGW. The Virtual Kubelet Pod is associated with a Virtual Node that represents the Far-edge device in the Kubernetes cluster. The figure below resumes the relationship between Virtual Kubelet, Virtual Node and Far-edge device, highlighting that one Far-edge device has its own Virtual Node and Virtual Kubelet.
In the remainder of this section, we guide you through the inclusion of Far-edge devices in a Kubernetes cluster using FITA and further explain how are Far-edge devices represented in the Kubernetes cluster. For this how to, we assume you have already installed FITA and IoTNetEmu.
Emulating Far-edge devices
To create a set of emulated devices to appear in FITA, we will use IoTNetEmu:
- Create a new folder in
~/.iotnetemu:
mkdir ~/.iotnetemu/fita-scenario
mkdir ~/.iotnetemu/fita-scenario/images
-
Download the Far-Edge node image from here
-
Copy the downloaded Far-Edge node image to
~/.iotnetemu/fita-scenario/images -
Create a new configuration file:
touch ~/.iotnetemu/fita-scenario/config.yaml
- Add the following to to
config.yaml:
nodes:
  node1:
    type: 'zephyr'
    image: 'images/embserve-1.0.1.elf'
    bootstrap:
      - 'embserve connector lwm2m server_add coap://10.10.12.254:30009 node1'
    networks:
      linux-br:
        ipv4_address: 10.10.12.1
        ipv4_gateway: 10.10.12.254

  node2:
    type: 'zephyr'
    image: 'images/embserve-1.0.1.elf'
    bootstrap:
      - 'embserve connector lwm2m server_add coap://10.10.12.254:30009 node2'
    networks:
      linux-br:
        ipv4_address: 10.10.12.2
        ipv4_gateway: 10.10.12.254

networks:
  linux-br:
    type: 'linux-br'
    host_address: 10.10.12.254
- If IoTNetEMU is running in a different host machine, add an additional application to redirect the traffic to the correct server. Do not forget to replace
<IP ADDRESS>by the address of the node running FITA:
applications:
  proxy:
    type: 'native'
    image: 'socat UDP4-LISTEN:30009,fork,so-bindtodevice=lnxbr-0,reuseaddr UDP4:<IP ADDRESS>:30009'
- Start IoTNetEMU:
docker container start -a -i iotnetemu

# Inside container
root@<host>:/# iotnetemu --workspace /iotnetemu/workspace/fita-scenario/
- The nodes should start to appear in the cluster.
The configurations presented above assume no changes to the FITA default deployment. If the external port of NextGenGW is changed from 30009, it needs to be changed accordingly in the IoTNetEMU configuration.
Far-edge devices in FITA
Now that IoTNetEMU is running, devices will start to connect to the NextGenGW LwM2M server and added to the cluster.
- Check that the Far-edge devices' Virtual Nodes are present in the cluster.
kubectl get nodes
You should see something like:
NAME                  STATUS   ROLES    AGE     VERSION
labnuc05              Ready    <none>   129d    v1.32.3
labnuc05-b1-node1     Ready    agent    4m53s   v1.15.2-g2651911
labnuc05-b1-node2     Ready    agent    4m51s   v1.15.2-g2651911
In our example, the node "labnuc05" is the node where we are running FITA. "labnuc05" is the hostname of this machine, which also prefixes the Virtual Nodes names, i.e., "labnuc05-b1-node1" and "labnuc05-b1-node2" in the example above.
"labnuc05-b1-node1" and "labnuc05-b1-node2" are the virtual representation of the Far-edge devices in the Kubernetes cluster. If you check their details using kubectl describe (don't forget to change the Virtual Node name with your Virtual Node name):
kubectl describe nodes labnuc05-b1-node1
You will find the set of labels below, which we use to characterise the Far-edge device resources. In this example, we are emulating Far-edge devices with an accelerometer, gyroscope and temperature_sensor. We also want to highlight the label "extra.resources.fhp/embserve=true", which we use to identify that this node uses embServe runtime.
Labels:             extra.resources.fhp/accelerometer=true
                    extra.resources.fhp/embserve=true
                    extra.resources.fhp/gyroscope=true
                    extra.resources.fhp/temperature_sensor=true
- Now check that the Far-edge devices' Virtual kubelet are in the cluster:
kubectl get pods -n fita
You should see something like:
NAME                                                     READY   STATUS    RESTARTS       AGE
fita-fita-6cbfb8b79-wlzpn                                3/3     Running   0              4d
far-edge-kubelet-labnuc05-b1-node1                       1/1     Running   0              23m
far-edge-kubelet-labnuc05-b1-node2                       1/1     Running   0              23m
The Pods "far-edge-kubelet-labnuc05-b1-node1" and "far-edge-kubelet-labnuc05-b1-node2" are the Kubernetes Kubelet agent of each Far-edge device. In our implementation, the Kubelet is responsible for interfacing the Kubernetes control plane with the NextGenGW, i.e., it translates the control plane requests into NextGenGW commands and receives from NextGenGW the status of Far-edge device Pods, as well as memory and CPU usage.
Now that we have Far-edge device in our Kubernetes cluster, we can start deploying Pods on them following the instructions in Deploy Workloads on Far-edge Devices.